")


")


")


")

")


")


")


")


")


")

")


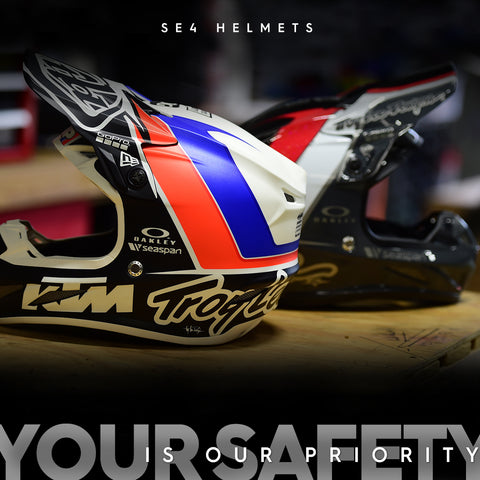
Our all new premier motocross SE4 Carbon Helmet comes with MIPS, incorporating brain rotational protection with 13% more EPS (Expanded Polystyrene) for ultimate head safety. This featherweight helmet comes in at only 1325 grams, creating the lightest helmet TLD has ever produced. This helmet comes with 6 top intakes feeding 10 internal ports for maximum cool air induction, couple that with 6 exhaust ports that are fed by 9 internal passages to provide excellent dissipation of heat and you've got one protective, lightweight, super-ventilated helmet.
WARNING: Visor can fracture under impact or in an accident. Do not use a helmet with a broken visor. Always wear eye protection. Only use a TLD approved visor and visor hardware on your helmet
If any portion of this warranty is held to be invalid or unenforceable for any reason, such finding will not invalidate any other provision. For products purchased in countries other than the United States please contact Troy Lee Designs authorized distributor in that respective country.
TO OBTAIN SERVICE UNDER THIS WARRANTY YOU MUST EITHER: Bring or send your Troy Lee Designs SE4 Helmet together with this warranty, the retail seller's original receipt or other satisfactory proof of the date of purchase to the retailer where you purchased the item. You can also send your Troy Lee Designs SE4 Helmet (with the return authorization number on the outside of the shipping container and affixed to the product), together with the retail seller's original receipt or other satisfactory proof of the date of purchase to: Troy Lee Designs Attn: Helmet Warranty Dept., 155 East Rincon. Corona, CA92879 USA. You must obtain a return authorization number by calling Troy Lee Designs, at (951)371-5219 or sending an E-mail to warranty@troyleedesigns.com prior to returning the product to Troy Lee Designs. Any postage, insurance or shipping cost incurred in sending your Troy Lee Designs product for service under either option above is your responsibility. Troy Lee Designs will not be responsible for products lost or damaged in shipping. For products purchased in countries other than the United States please contact the Troy Lee Designs authorized distributor in the country where the product was purchased. They can be warranty replacement request form before processing your warranty claim.
CRASH REPLACEMENT POLICY: Troy Lee Designs understands that accidents will happen. As a result, Troy Lee Designs will assist with the replacement of your helmet by providing a 30% discount off of Troy Lee Designs current suggested retail price in your respectivecountry. All other provisions of this warranty apply and the procedures outlined for warranty service apply also to the accident replacement policy Troy Lee Designs will make the final decision on whether the part will be covered under the crash replacememt policy.
WARRANTY EXCLUSIONS: Retailers and sellers of Troy Lee Designs product are not authorized to modify this warranty in any way. It is your responsibility to regularly examine the product to determine the need for normal service or replacement. This warranty does not cover the following:
Helmet specifications are subject to change without notice.
(© 2015 Troy Lee Designs)
The SE3 MX helmet utilizes innovative features that set it apart from the norm. Highly developed off-road materials and processes, advanced composites and hardware along with systems and designs exclusive to TLD keep you protected in the most critical moment. The Troy Lee Designs SE3 helmet is an essential piece of head protection for todays motocross racer.

With the introdudction of the SE-3 helmet, Troy Lee Designs has developed a Dual Density two piece EPS impact absorbing liner. This state of the art advancement greatly improved the ability to fine tune the energy absorbing aspects and performance of the helmet. These new SE-3 helmet models with Dual Density liners have prove to perform so well that they exceed the latest motorcycle helmet certification standards including the most extreme Snell M2010 standard.

Troy Lee Designs is excited to introduce an important advancement in impact management, the exclusive Troy Lee Designs Dual Density Shock Pad System. The use of strategically positioned Multi Impact Shock Pads on the inside surface of the EPS liner provides a primary impact material of lower density than the deeply channeled EPS liner. This advanced shock pad layer provides low speed impact absorption and a noticeable improvement in comfort and durability, for irritating and frequent lighter hits that might otherwise cause damage to the delicate single impact EPS liner. The newly developed Shock Pad System can help absorb many small impacts.
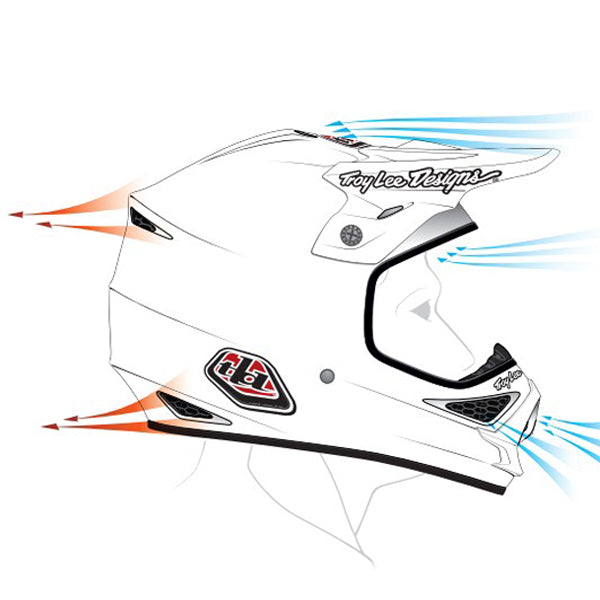
Our exclusive multi level internal ventilation system utilizes different locations, pressures, and volumes of air (pushed and pulled) through 12 intake and 4 large exhaust vents. Over 8 square inchyes of intake area and 14 internal channels ensure plenty of fresh air enters and flows through the helmet. The large rear exhaust vents work in conjunction with the shell shape, by actually creating a low pressure area behind the helmet, therefore drawing hot air out to provide an extremely efficient ventilation system.
WARNING: Visor can fracture under impact or in an accident. Do not use a helmet with a broken visor. Always wear eye protection. Only use a TLD approved visor and visor hardware on your helmet
Troy Lee Designs warrants to the original retail purchaser("you") that the Troy Lee Designs products for which they received this warranty is free from defects in material and workmanship for 3 years from the date of original retail purchase. This warranty is not transferable to a subsequent purchaser. Troy Lee Designs sole obligation under this warranty is to repair or replace the product, at Troy Lee Designs option. Troy Lee Designs must be notified in writing of any claim under this warranty within 60 days of any claimed lack of comformity of the product.
The duration of any implied warranty or condition, of merchantability, fitness for a particular purpose, or otherwise, on this product shall be limited to the duration of the express warranty set forth above. In no event shall Troy Lee Designs be liable for any loss, inconvenience or damage, whether direct, incidental, consequential or otherwise, resulting from breach of any express or implied warranty or condition, of merchantability, fitness for a particular purpose, or otherwise with respect to this product, except as set forth herein. Some states or countries do not allow limitation on how long an implied warranty lasts and some do not allow exclusions orlimitations of incidental or consequential damages, so the above limitations or exclusions may not apply to you. This warranty gives you specific legal rights, and you may also have other rights, which may vary, from location to location. This warranty will be interpreted pursuant to the laws of the United States. The original English language version/meaning of this warranty controls over all translations and Troy Lee Designs is not responsible for any errros in translation of this warranty or any product instructions. This warranty is not intended to conver any additional legal, jurisdictional or warranty rights to you other that those set forth herein or required by law. If any portion of this warranty is held to be invalid or unenforceable for any reason, such finding will not invalidate any other provision. For products purchased in countries other than the United States please contact Troy Lee Designs authorized distributor in that respective country.
Troy Lee Designs nderstands that accidents will happen. As a result, Troy Lee Designs will assist with the replacement of your helmet by providing a 30% discount off of Troy Lee Designs current suggested retail price in your respective country. All other provisions of this warranty apply and the procedures outline for warranty service apply also to the accident replacement policy. Troy Lee Designs will make the final decision on whether the part will be covered under the crash replacement policy.
WARRANTY EXCLUSIONS: Retailers and sellers of Troy Lee Designs product are not authorized to modify this warranty in any way. It is your responsibility to regularly examine the product to determine the need for normal service or replacement. This warranty does not cover the following:
Helmet specifications are subject to change without notice.
(© 2015 Troy Lee Designs)
Our Air helmet is the embodiment of patented technologies that have made Troy Lee Designs a leader in the off-road helmet market worldwide. Each one is made with advanced materials and features that are common to all TLD helmets. From our unique pre-preg carbon / composite shell and forced air ventilation system to our dual-density impact liner, the Air helmet will give you the confi dence to ride to your limits without sacrifi cing safety and style.


Our exclusive multi level internal ventilation system utilizes different locations, pressures, and volumes of air (pushed and pulled) through 12 intake and 4 large exhaust vents. Over 8 square inches of intake area and 14 internal channels ensure plenty of fresh air enters and flows through the helmet. The large rear exhaust vents work in conjunction with the shell shape, by actually creating a low pressure area behind the helmet, therefore drawing hot air out to provide an extremely efficient ventilation system.
WARNING: Visor can fracture under impact or in an accident. Do not use a helmet with a broken visor. Always wear eye protection. Only use a TLD approved visor and visor hardware on your helmet
Troy Lee Designs warrants to the original purchasers ("you") that the Troy Lee Designs product for which they received this warranty is free from defects in material and workmanship for ONE year from the date of original retail purchase. This warranty is not transferable to a subsequent purchaser. Troy Lee Designs sole obligation under this warranty is to repair or replace the product, at Troy Lee Designs discretion. Troy Lee Designs must be notified in writing of any claim under this warranty within 60 days of any claimed lack of conformity of the product, and with proof of purchase.
The duration of any implied warranty or condition, of merchantability, fitness for a particular purpose, or otherwise, on this product shall be limited to the duration of the express warranty set forth above. In no event shall Troy Lee Designs be liable for any loss, inconvenience or damage, whether direct, incidental, consequential or otherwise, resulting from breach of any express or implied warranty or condition, of merchantability, fitness for a particular purpose, or otherwise with respect to this product, except as set forth herein. Some states or countries do not allow limitation on how long an implied warranty lasts and some do not allow exclusions orlimitations of incidental or consequential damages, so the above limitations or exclusions may not apply to you. This warranty gives you specific legal rights, and you may also have other rights, which may vary, from location to location. This warranty will be interpreted pursuant to the laws of the United States. The original English language version/meaning of this warranty controls over all translations and Troy Lee Designs is not responsible for any errros in translation of this warranty or any product instructions. This warranty is not intended to conver any additional legal, jurisdictional or warranty rights to you other that those set forth herein or required by law. If any portion of this warranty is held to be invalid or unenforceable for any reason, such finding will not invalidate any other provision. For products purchased in countries other than the United States please contact Troy Lee Designs authorized distributor in that respective country.
TO OBTAIN SERVICE UNDER THIS WARRANTY YOU MUST EITHER: Bring or send your Troy Lee Designs Air Helmet together with this warranty, the retail seller's original receipt or other satisfactory proof of the date of purchase to the retailer where you purchased the item. You can also send your Troy Lee Designs Air Helmet (with the return authorization number on the outside of the shipping container and affixed to the product), together with the retail seller's original receipt or other satisfactory proof of the date of purchase to: Troy Lee Designs Attn: Helmet Warranty Dept., 155 East Rincon. Corona, CA92879 USA. You must obtain a return authorization number by calling Troy Lee Designs, at (951)371-5219 or sending an E-mail to warranty@troyleedesigns.com prior to returning the product to Troy Lee Designs.
CRASH REPLACEMENT POLICY: Troy Lee Designs understands that accidents will happen. As a result, Troy Lee Designs will assist with the replacement of your helmet by providing a 30% discount off of Troy Lee Designs current suggested retail price in your respectivecountry. All other provisions of this warranty apply and the procedures outlined for warranty service apply also to the accident replacement policy Troy Lee Designs will make the final decision on whether the part will be covered under the crash replacememt policy.
WARRANTY EXCLUSIONS: Retailers and sellers of Troy Lee Designs product are not authorized to modify this warranty in any way. It is your responsibility to regularly examine the product to determine the need for normal service or replacement. This warranty does not cover the following:
Helmet specifications are subject to change without notice.
(© 2015 Troy Lee Designs)
Read this manual carefully before wearing your new helmet follow all instructions completely


1. Always wear your helmet about 1 inch (2.54 cm) above your brow to protect your forehead; helmet should be in a level position across your forehead and ears, left to right and front to back.
2. Helmet should not be worn tilted back exposing your forehead. Strap should not be loose and out from under your chin.
3. Pull out tab on release strap. Slide snap till desired strap length is reached. Push tab bak in to secure strap.
4. Adjust strap so the back strap fits behind and clears your ear, and fits snug to the side of your head behind the ear. Front strap should aslo e adjusted to be taught against the side of the face. The helmet should be adjusted so that the straps do not cover the ears and the straps and buckle adjusted to be both comfortable yet firm.
5. Secure chin strap snap by pushing opposite ends together. A click sound will make sure you have the chin strap buckle securely fastened. Push inward on side prongs to release chin strap buckle. Be careful that your neck does not get pinched from chin strap snap. The buckle should be positioned away from the jawbone. Make sure to tighten the chin strap well back against the throat and NOT on the point of your chin. Straps worn too close to the chin increases the chance of the helmet coming off during an accident.
6. Adjust chin strap tightness by feeding strap through pulling at opposite end. Wrap excess strap under rubber grommet. Not securing the loose ends with the rubber grommet can result in the helmet coming off accidentally.
7-8. Twist stabilizer wheel (at rear of helmet) clockwise to tighten against the back of the head. Tighten until helmet fits snug and securely. Twist stabilizer wheel counter-clockwise to loosen tension against back of head to remove helmet.
9-10. Adjust stabilizers reach on back of head by gently pulling out end of arm protruding into helmet shell. Locate the end of the stabilizer ball mount in one of the three holes for desired fit. Push to click for secure mounting.
CHECK THE FIT: Before using the helmet, make sure that it fits correctly, it is positioned to cover your entire forehead, the straps are correctly adjusted, and the chin strap is tight. Grab the helmet with both hands and twist it to the left and right. If the helmet fits correctly, the skin on your forehead will move as the helmet moves. If the skin on your forehead does not move, the helmet is too loose.
CHECK THE STRAPS: With the helmet on and the chin strap buckled, grab the helmet with both hands and try to remove it by rolling the helmet forward and backward as far as you can. Make a serious effort. If you can roll/push the helmet off the head completely in either direction or roll it forward so far that it blocks vision or backwards so far that it exposes the forehead, YOUR HELMET DOES NOT FIT CORRECTLY. Repeat STEPS above until helmet movement is minimal
TEST RIDE: Once you are satisfied that the helmet fits correctly and that all straps are properly adjusted, tightened, and secured, take a short bicycle ride in a area free from traffic and other hazards. Pay attention to overall comfort and stability while riding. Make minor adjustments to the fit pads and straps to improve comfort and stability. DO NOT make any adjustments to the helmet while riding as this could cause you to loose control of the bike or cause the helmet to fall off and become damaged or entangled in your wheels causing a crash.
13. Remove all 3 aluminum bolts to remove visor. Twist bolts counter-clockwise to loosen
14. Adjust visor by turning center bolt counter clockwise and moving visor to desired height.
Re-tighten bolt turning clockwise to secure. DO NOT over torque as this can permanently damage the helmet (making it unsafe) or damage the visor.
15. Install liner using specifically located Velcro mounting points. Liner will stick to Velcro and hold liner into position.
16. Insert liner into shell by starting at the front of the forehead securing the liner to Velcro mounts as you work to the back of the helmet. (see diagram for positioning of liner) Liner can be trimmed in 2 locations to adjust fit and increase airflow. Use scissors and trim on marked lines only. Removing padding may cause fit issues on some types of head shapes.
The helmet can only protect if it fits well so the user should try different sizes and choose the size which feels the most secure and comfortable on the head. Measure your head size. Wrap a tape measure horizontally around your head at a height of about 1 inch (2.54 cm) above your eyebrows and even with the tops of your ears to obtain the largest head measurement.
Bicycle helmet—NOT intended for use in motor sports or by motorcyclists. No helmet can protect against all possible impacts and serious injury or death could occur. Some head injuries cannot be prevented by this helmet (for example involving bicycle to motor vehicle collisions) and this helmet can only attempt to protect areas it covers so facial and neck injuries cannot be prevented with this helmet. Depending on the type of impact even a very low speed accident can result in a serious head injury or fatality. Warning! This helmet should not be used by children while climbing or doing other activities when there is a risk of strangulation/hanging if the child gets trapped with the helmet. A helmet is NOT a toy. DO NOT allow your small children to play with your helmet. They can accidentally damage it or hurt themselves. It is also possible that they could choke on the buckles on the straps.
Read this manual carefully before wearing your new helmet follow all instructions completely
1. Always wear your helmet about 1 inch (2.54 cm) above your brow to protect your forehead; helmet should be in a level position across your forehead and ears, left to right and front to back.
2. Helmet should not be worn tilted back exposing your forehead. Strap should not be loose and out from under your chin.
Semi adjustable side strap allows slight adjustment to remove slack in the front or back strap lengths. Depending where the slack is this might affect where the chinstrap lands under your chin and location of the strap across the side of your face. A well-adjusted strap should be taught on front and back and land in a centered and comfortable location underneath your chin
4. To loosen/add length to front strap and remove extra strap slack at the rear feed rear strap through side strap divider hole and pull through back side feeding strap up and into the front strap hole, increasing the front strap length. To lengthen rear strap or remove slack in the front reverse strap feed process
5. Secure chin strap snap by pushing opposite ends together. A click sound will make sure you have the chin strap buckle securely fastened. Push inward on side prongs to release chin strap buckle. Be careful that your neck does not get pinched from chin strap snap. The buckle should be positioned away from the jawbone. Make sure to tighten the chin strap well back against the throat and NOT on the point of your chin. Straps worn too close to the chin increases the chance of the helmet coming off during an accident.
6. Adjust chin strap tightness by feeding strap through pulling at opposite end. Wrap excess strap under rubber grommet. Not securing the loose ends with the rubber grommet can result in the helmet coming off accidentally.
7-8. Twist stabilizer wheel (at rear of helmet) clockwise to tighten against the back of the head. Tighten until helmet fits snug and securely. Twist stabilizer wheel counter-clockwise to loosen tension against back of head to remove helmet.
9-10. Adjust stabilizers reach on back of head by gently pulling out end of arm protruding into helmet shell. Locate the end of the stabilizer ball mount in one of the three holes for desired fit. Push to click for secure mounting.
CHECK THE FIT: Before using the helmet, make sure that it fits correctly, it is positioned to cover your entire forehead, the straps are correctly adjusted, and the chin strap is tight. Grab the helmet with both hands and twist it to the left and right. If the helmet fits correctly, the skin on your forehead will move as the helmet moves. If the skin on your forehead does not move, the helmet is too loose.
CHECK THE STRAPS: With the helmet on and the chin strap buckled, grab the helmet with both hands and try to remove it by rolling the helmet forward and backward as far as you can. Make a serious effort. If you can roll/push the helmet off the head completely in either direction or roll it forward so far that it blocks vision or backwards so far that it exposes the forehead, YOUR HELMET DOES NOT FIT CORRECTLY. Repeat STEPS above until helmet movement is minimal
TEST RIDE: Once you are satisfied that the helmet fits correctly and that all straps are properly adjusted, tightened, and secured, take a short bicycle ride in a area free from traffic and other hazards. Pay attention to overall comfort and stability while riding. Make minor adjustments to the fit pads and straps to improve comfort and stability. DO NOT make any adjustments to the helmet while riding as this could cause you to loose control of the bike or cause the helmet to fall off and become damaged or entangled in your wheels causing a crash.
13. Remove all 3 aluminum bolts to remove visor. Twist bolts counter-clockwise to loosen
14. Adjust visor by turning center bolt counter clockwise and moving visor to desired height.
Re-tighten bolt turning clockwise to secure. DO NOT over torque as this can permanently damage the helmet (making it unsafe) or damage the visor.
15. Install liner using specifically located Velcro mounting points. Liner will stick to Velcro and hold liner into position.
16. Insert liner into shell by starting at the front of the forehead securing the liner to Velcro mounts as you work to the back of the helmet. (see diagram for positioning of liner) Liner can be trimmed in 2 locations to adjust fit and increase airflow. Use scissors and trim on marked lines only. Removing padding may cause fit issues on some types of head shapes.
The helmet can only protect if it fits well so the user should try different sizes and choose the size which feels the most secure and comfortable on the head. Measure your head size. Wrap a tape measure horizontally around your head at a height of about 1 inch (2.54 cm) above your eyebrows and even with the tops of your ears to obtain the largest head measurement.
Bicycle helmet—NOT intended for use in motor sports or by motorcyclists. No helmet can protect against all possible impacts and serious injury or death could occur. Some head injuries cannot be prevented by this helmet (for example involving bicycle to motor vehicle collisions) and this helmet can only attempt to protect areas it covers so facial and neck injuries cannot be prevented with this helmet. Depending on the type of impact even a very low speed accident can result in a serious head injury or fatality. Warning! This helmet should not be used by children while climbing or doing other activities when there is a risk of strangulation/hanging if the child gets trapped with the helmet. A helmet is NOT a toy. DO NOT allow your small children to play with your helmet. They can accidentally damage it or hurt themselves. It is also possible that they could choke on the buckles on the straps.

APPLICATION INSTRUCTIONS:

Each Knee Brace comes with 5° extension stops pre installed. At the direction of a medical professional, extension and flexion settings may be changed. Optional 0°, 10°, 15°, 20°, and 25° extension stops and 45°, 60°, 75°, and 90° flexion stops are included with each brace.
IMPORTANT: BOTH HINGES MUST BE SET TO SAME EXTENSION AND FLEXION SETTINGS. FOR 0° EXTENSION LIMITING, THE 0° EXTENSION STOPS MUST BE USED.

SIZES/COLORS
| BLACK | YOUTH | ADULT M | ADULT L |
| WHITE | - | ADULT M | ADULT L |

SIZES/COLORS
| BLACK | ADULT M | ADULT L |
| WHITE | ADULT M | ADULT L |
PROPER FITTING:
Measure your chest circumference near the under arm and your height; it should fall into one of the following size measurements:
| CP 5955 & 5900 | YOUTH | M | L |
|---|---|---|---|
| CHEST CIRCUMFERENCE | 28”-32” | 34”-38” | 40”-45” |
| HEIGHT | 4.0”-5.2” | 5.0”-5.8” | 5.6”-6.2” |
The shoulders should not slide down your arms. Straps on rib area and biceps are adjustable, so make straps snug and make sure there are no major gaps between the chest protector and your upper body.
MATERIALS:
CP 5955 / WHITE
FRONT

BACK


DETACHABLE PIECES FOR NECK BRACE, CUSTOMIZATIONS AND COMFORT
FRONT

BACK

DETACHABLE PIECES FOR NECK BRACE, CUSTOMIZATIONS AND COMFORT

SIZES: X S , S , M , L
MATERIALS:

SIZES: XS , S , M , L
MATERIALS:
Take measurements 3” above knee for lower thigh, 6” below knee for mid calf, and 4” below knee for top calf area. Circumference measurements should fall into approximately one of the following size cat egories:
| KG 5400 | XS | S | M | L |
|---|---|---|---|---|
| LOWER THIGH | 15”-17” | 16”-18” | 16.5”-18.5” | 18”-21” |
| TOP CALF | 13”-14.5” | 14”-16” | 14.5”-17” | 15”-18” |
| KG 5450 | XS | S | M | L |
|---|---|---|---|---|
| LOWER THIGH | 15”-17” | 16”-18” | 16.5”-18.5” | 18”-21” |
| TOP CALF | 13”-14” | 13”-15” | 14”-15.5” | 14.5”-17.5” |

HEAD BAND
EXPANDED POLYSTYRENE: EPS extends lower in occipital area [rear of the head] for extended protection
TRIPLE DENSITY EPS: Prepared for all speed impacts. LOW | MEDIUM | HIGH SPEEDS
Over 300 helmets, including every major industry brand, were destroyed in extensive third party testing performed at ACT labs in Los Angeles, California. The results speak for themselves.

PROTECTION | MIPS
Mips is a revolutionary technology that lets the helmet slide relative to the head, adding more protection against rotational violence to the brain caused by certain impacts.

EPP (Expanded PolyPropylene) chin bar provides lightweight, durable protection.

Anatomically contoured 3D cheek pads with emergency release system allows EMS responders to easily remove cheek pads before removing the helmet.

16 intake ports channel cool air around and over a rider’s head forcing hot sweaty air out through 6 rear exhaust ports.

Plastic visor screws combined with brass inserts are durable while providing break-away protection.

Stainless Steel D-rings are both strong and light.

3 shell sizes for a perfect, low-profle ft across 6 helmet sizes.
EPP (Expanded PolyPropylene) chin bar provides lightweight, durable protection.
Anatomically contoured 3D cheek pads with emergency release system allows EMS responders to easily remove cheek pads before removing the helmet.
16 intake ports channel cool air around and over a rider’s head forcing hot sweaty air out through 6 rear exhaust ports.
Plastic visor screws combined with brass inserts are durable while providing break-away protection.
Stainless Steel D-rings are both strong and light.
3 shell sizes for a perfect, low-profle ft across 6 helmet sizes.

Advanced composite shell provides lightweight protection.

Includes Troy Lee Designs drawstring helmet sock.

The revolutionized Tech 7 MX boot incorporates innovative materials and technology in a completely new design for a lighter, more anatomically profled performer. This CE certifed boot promotes core stability and flex via a biomechanical pivot while offering excellent ankle protection. The boot chassis has been designed to give complete feel and optimized interaction with bike controls, while the innovative buckle system allows easy, precise closure.
Hand wash cold, with similar colors. Do not dry clean nor bleach. Drip dry. Do not clean your protective gear with anything but soap and water. Do not use any abrasive cleaners or pads. Do not use hot wa ter or chemical cleaners (like glass cleaner) or any solvents which contain petroleum based prod ucts like benzene or gasoline on your protec tive gear. Your protective gear can be weakened by these substances and may not provide its intended protection in an accident, which can result in serious injury or death.

This product meets the CE standard

Tested by CRITT Sport Loisirs - Zone du Sanital
86100 Chatellerault - France - # 0501
Only Hand wash the Speed Sleeve in cold water with mild soap or detergent and permit to drip dry. Never machine dry or dry clean. Never use abrasive cleaners or pads, hot water, chemical cleaners (such as glass cleaner), or any petroleum-based solvents (such as benzene or gasoline).
STORAGE – Store Speed Sleeve in a dry, ventilated environment that is out of sunlight and away from direct heat sources. Do not store in automobile or under heavy items. INSPECTION – Inspect your Speed Sleeve (including its fitting system) before each ride and after any crash for signs of wear, crack, break, or other damage. If the product is damaged, or if there is any doubt as to its condition, it must be replaced and not be used
The expected life for this product is two years from the date of purchase unless the product is damaged, in which case it must be replaced. Crashes and improper care may damage the Speed Sleeve.
The primary intended protection offered by the Speed Sleeve is the prevention of limb joint (elbow or knee) minor abrasion through mechanical action and relative motion between the user’s limb joint and off-road (unpaved) terrain during modest mountain-biking (off-pavement cycling sport) activities. The Speed Sleeve is not intended for powered cycling or aggressive mountain biking—including downhill, freeride, and dirt jump—where greater abrasion or impact protection may be needed. The Speed Sleeve is intended for use at temperatures between 15°C and 35°C. The Speed Sleeve is not a toy and is not intended for users with a body mass of less than 20 kg (45 lbs) or less than 14 years old.
| ELBOW SLEEVE | XS/S | M/L | XL/XXL |
|---|---|---|---|
| WRIST | 15 - 17.5 cm | 17.5 - 20 cm | 20 - 22.5 cm |
| UPPER BICEP | 25.5-30.5 cm | 30.5 - 35.5 cm | 35.5 - 40.5 cm |
| USER WEIGHT (KG) | 32 - 63 | 63 - 82 | 82 - 100 |
| USER WEIGHT (LBS) | 70 - 140 | 140 - 180 | 180 - 220 |
| KNEE SLEEVE | YOUTH - MD | YOUTH - LG | XS/S | M/L | XL/XXL |
|---|---|---|---|---|---|
| LOWER THIGH | 25-29cm | 29-34cm | 34.5-39.5cm | 39.5-44.5cm | 44.5-49.5cm |
| CALF | 24-28cm | 28-32cm | 32-37cm | 37-42cm | 42 - 47cm |
| USER WEIGHT (KG) | 20-27 | 27-32 | 32-63 | 63-82 | 82-100 |
| USER WEIGHT (LBS | 45-60 | 60-70 | 70-140 | 140-180 | 180-220 |
Measure around chest circumference near under arm; it should fall into one of the size categories specified below:
| YOUTH | M | L | XL | |
| CHEST CIRCUMFERENCE | 26”-27” | 28”-29” | 30”-32” | |
| ADULT | S | M | L | XL |
| CHEST CIRCUMFERENCE | 34”-35” | 36”-38” | 40”-42” | 44”-46” |
The Base Protective Shirts and Vest should not fall off shoulders and should not slip off during movement.
Measure 6” from elbow to lower forearm and 4” from elbow to mid forearm and 3” from elbow to mid-bicep area. Circumference measurements should fall into approximately one of the following size categories:
| EG 5550 | XS | S | M | L |
|---|---|---|---|---|
| LOWER FOREARM | 5”-6.5” | 5.5”-7” | 6.5”-8” | 7”-8.5” |
| MID BICEPS | 9.5”-11.5” | 10”-12” | 10.5”-12.5” | 10.5”-13” |
| USER WEIGHT (LBS) | 70-90 | 90-140 | 140-180 | 180-220 |
MAIN: 100% Polyester INSIDE: 100% Polyester BACK SIDE: 82% Nylon 18% Spandex PAD: EVA
| EG 5500 | XS | S | M | L |
|---|---|---|---|---|
| MID FOREARM | 5.5”-6.5” | 6”-7” | 6.5”-8” | 7.5”-9” |
| MID BICEPS | 9.5”-11” | 10”-11.5” | 10.5”-12” | 11”-13” |
| USER WEIGHT (LBS) | 70-90 | 90-140 | 140-180 | 180-220 |
| USER WEIGHT (KG) | 32-41 | 41-63 | 63-82 | 82-100 |
MAIN: 100% Polyester INSIDE: 100% Polyester BACK SIDE: 82% Nylon 18% Spandex PAD: EVA
The elbow pad should not be loose in any area. Make sure there are no gaps between pad and arm and the openings are tight.
The proper fitting of a wrist support system is similar to glove size as the system should be worn over a glove. Choose the wrist support size according to the glove size categories below:
WRIST SUPPORT
| LEFT & RIGHT | S | M | L |
|---|---|---|---|
| 5270- L01/R02 | 08 | 09 | 10 |
| WS 5205 | S | M | L |
| GLOVE SIZE | Y-S | M-L | L-XXL |
| USER WEIGHT (LBS) | 70-120 | 120-170 | 170-220 |
| USER WEIGHT (KG) | 32-54 | 54-77 | 77-100 |
WRIST SUPPORT
| LEFT & RIGHT | S | M | L |
|---|---|---|---|
| 5271- L01/R02 | 08 | 09 | 10 |
| WS 3205 | S | M | L |
| GLOVE SIZE | Y-S | M-L | L-XXL |
| USER WEIGHT (LBS) | 70-120 | 120-170 | 170-220 |
| USER WEIGHT (KG) | 32-54 | 54-77 | 77-100 |
The wrist support system should fit loose in any area. Make straps snug and make sure there are no gaps between pad and wrist. Do not overtighten. Wrist support is intended to be worn over a glove.
SIZES: XS, S, M, L
MATERIALS: MAIN: 100% Polyester INSIDE: 100% Polyester BACK SIDE: 82% Nylon 18% Spandex PAD: EVA
SIZES: XS, S, M, L
MATERIALS: MAIN: 100% Polyester INSIDE: 100% Polyester BACK SIDE: 82% Nylon 18% Spandex PAD: EVA
Take measurements 3” above knee for lower thigh, 6” below knee for mid calf, and 4” below knee for top calf area. Circumference measurements should fall into approximately one of the following size categories:
| KG 5400 | XS | S | M | L |
|---|---|---|---|---|
| LOWER THIGH | 15”-17” | 16”-18” | 16.5”-18.5” | 18”-21” |
| TOP CALF | 13”-14.5” | 14”-16” | 14.5”-17” | 15”-18” |
| USER WEIGHT (LBS) | 70-90 | 90-140 | 140-180 | 180-220 |
| USER WEIGHT (KG) | 32-41 | 41-63 | 63-82 | 82-100 |
| KG 5450 | XS | S | M | L |
| LOWER THIGH | 15”-17” | 16”-18” | 16.5”-18.5” | 18”-21” |
| MID CALF | 13”-14” | 13”-15” | 14”-15.5” | 14.5”-17.5” |
| USER WEIGHT (LBS) | 70-90 | 90-140 | 140-180 | 180-220 |
| USER WEIGHT (KG | 32-41 | 41-63 | 63-82 | 82-100 |
The knee pad should not be loose in any area. Make sure there are no gaps between pad and leg, and the openings are tight.
Measure your chest circumference near the under arm and your height; it should fall into one of the following size measurements:
| CP 5955 & 5900 | YOUTH | M | L |
|---|---|---|---|
| CHEST CIRCUMFERENCE | 28”-32” | 34”-38” | 40”-45” |
| HEIGHT | 4.0”-5.2” | 5.0”-5.8” | 5.6”-6.2” |
The shoulders should not slide down your arms. Straps on rib area and biceps are adjustable, so make straps snug and make sure there are no major gaps between the chest protector and your upper body.
BODY: 82% Polyester 18% Spandex INSIDE: 84% Nylon 16% Spandex
SIZES/COLORS
| BLACK | ADULT M | ADULT L |
| WHITE | ADULT M | ADULT L |
SIZES/COLORS
| BLACK | YOUTH | ADULT M | ADULT L |
| WHITE | - | ADULT M | ADULT L |
The revolutionized Tech 7 MX boot incorporates innovative materials and technology in a completely new design for a lighter, more anatomically profled performer. This CE certifed boot promotes core stability and flex via a biomechanical pivot while offering excellent ankle protection. The boot chassis has been designed to give complete feel and optimized interaction with bike controls, while the innovative buckle system allows easy, precise closure.
| SIZE 8 | SIZE 9 | SIZE 10 | SIZE 11 | SIZE 12 | SIZE 13 |
| SIZE 8 | 9 | 10 | 11 | 12 | 13 |

Each helmet model has small differences in its shape that ultimately affect the fit. For this reason, it is essential to test a helmet before buying it. Test whether it sits on your head properly by putting on the helmet and moving your head to the left and right, as well as up and down while holding the helmet firmly with both hands. If your head can move too freely within the helmet, we recommend that you try a smaller size. If you feel local pressure points, then choose a helmet that is one size larger, or perhaps try on a different model.
Wrap a cloth measuring tape around your head just above your eyebrows and ears. Pull the tape comfortably snug, read the length, repeat for good measure and use the largest measurement.
| HELMET SIZE | HAT SIZE | CM | INCHES |
|---|---|---|---|
| X-SMALL | 6-5/8 to 6-3/4 | 53 to 54 | 20-7/8 to 20-1/4 |
| SMALL | 6-3/4 to 7 | 54 to 56 | 21-1/4 to 22 |
| MEDIUM | 7 to 7-1/4 | 56 to 58 | 22 to 22-3/4 |
| LARGE | 7-1/4 to 7-1/2 | 58 to 60 | 22-3/4 to 23-5/8 |
| X-LARGE | 7-1/2 to 7-3/4 | 60 to 62 | 23-5/8 to 24-1/2 |
| 2X-LARGE | 7-3/4 to 7-7/8 | 62 to 63 | 24-1/2 to 24-7/8 |
| HELMET SIZE | HAT SIZE | CM | INCHES |
|---|---|---|---|
| X-SMALL | 6-1/2 to 6-5/8 | 52 to 53 | 20.5 to 20.9 |
| SMALL | 6-3/4 to 6-7/8 | 54 to 55 | 21.3 to 21.7 |
| MEDIUM | 7 to 7-1/8 | 56 to 57 | 22 to 22-4 |
| LARGE | 7-1/4 to 7-3/8 | 58 to 59 | 22.8 to 23.2 |
| X-LARGE | 7-1/2 to 7-3/4 | 60 to 62 | 23.6 to 24.4 |
| 2X-LARGE | 7-7/8 to 8-1/8 | 63 to 65 | 24.8 to 25.6 |
| HELMET SIZE | HAT SIZE | CM | INCHES |
|---|---|---|---|
| XS/SM | 6-1/2 to 6-7/8 | 53 to 55 | 21 to 22 |
| MD/LG | 7 to 7-3/8 | 56 to 59 | 22.4 to 23.3 |
| XL/2XL | 7-1/2 to 7-3/4 | 60 to 62 | 23.7 to 24.5 |
| HELMET SIZE | HAT SIZE | CM | INCHES |
|---|---|---|---|
| XS/SM | 6-3/4 to 7 | 54 to 56 | 21.3 to 22 |
| MD/LG | 7-1/8 tp 7-3/8 | 57 to 59 | 22.4 to 23.2 |
| XL/2XL | 7-1/2 tp 7-7/8 | 60 to 62 | 22.6 to 24.8 |
* Headliners and cheekpads can be interchanged within the same EPS size. SE3 cheekpads are interchangable through the entire size range.

| Size | A| CHEST | B| FRONT LENGTH | C| CENTER BACK SLEEVE |
|---|---|---|---|
| Youth XS | 14 | 23 | 22 |
| Youth S | 15.5 | 24 | 24 |
| Youth M | 17 | 25 | 26 |
| Youth L | 18.5 | 26 | 28 |
| Youth XL | 20 | 27 | 30 |
| Small | 21 | 28 | 33 |
| Medium | 22 | 29 | 35 |
| Large | 23 | 30 | 37 |
| X-Large | 24 | 31 | 38 |
| XX-Large | 25.5 | 32 | 39 |
| XXX-Large | 26.5 | 33 | 39 |
| Size | A| CHEST | B| FRONT LENGTH | C| CENTER BACK SLEEVE |
|---|---|---|---|
| X-Small | 20 | 26 | 31 |
| Small | 21 | 27 | 32 |
| Medium | 22 | 28 | 34 |
| Large | 23 | 29 | 36 |
| X-Large | 24 | 30 | 37 |
| XX-Large | 25.5 | 31 | 38 |
* Measurements in inches

| Size | A| CHEST | B| FRONT LENGTH | C| SLEEVE LENGTH |
|---|---|---|---|
| Small | 22 | 24.5 | 15.25 |
| Medium | 23 | 25 | 15.5 |
| Large | 24 | 26 | 15.75 |
| X-Large | 25 | 27 | 16 |
| XX-Large | 26 | 28 | 16.25 |
* Measurements in inches
| Size | CHEST | FRONT LENGTH | CENTER BACK SLEEVE |
|---|---|---|---|
| Small | 19 | 27 | 32 |
| Medium | 20 | 28 | 32.5 |
| Large | 21 | 29 | 33 |
| X-Large | 22 | 30 | 34 |
| Size | CHEST | FRONT LENGTH | CENTER BACK SLEEVE |
|---|---|---|---|
| X-Small | 17 | 24 | 31 |
| Small | 18 | 25 | 31.5 |
| Medium | 19 | 26 | 32 |
| Large | 20 | 27 | 32.5 |
| X-Large | 21 | 28 | 33 |
* Measurements in inches
| Size | A| CHEST | B| FRONT LENGTH | C| SLEEVE LENGTH |
|---|---|---|---|
| Small | 19 | 21.75 | 13.5 |
| Medium | 20 | 22.5 | 14 |
| Large | 21 | 23.25 | 14.5 |
| X-Large | 22 | 24 | 15 |
| Size | A| CHEST | B| FRONT LENGTH | C| SLEEVE LENGTH |
|---|---|---|---|
| Small | 22 | 24.5 | 22.5 |
| Medium | 23 | 25 | 22.75 |
| Large | 24 | 26 | 23 |
| X-Large | 25 | 27 | 23.25 |
| XX-Large | 26 | 28 | 23.5 |
| Size | A| CHEST | B| FRONT LENGTH | C| SLEEVE LENGTH |
|---|---|---|---|
| Small | 17.5 | 26 | 10.5 |
| Medium | 18.5 | 27 | 11 |
| Large | 20 | 28 | 11.5 |
| X-Large | 21.5 | 29 | 12 |
* Measurements in inches

| Size | A| WAIST (relaxed-stretched) | B| INSEAM | C| KNEE WIDTH | D| Leg Length (outseam) |
|---|---|---|---|---|
| 28 | 29 - 33 | 30.5 | 11 | 38.5 |
| 30 | 31 - 34 | 31 | 11.5 | 39.5 |
| 32 | 33 - 36 | 32 | 12 | 40 |
| 34 | 35 - 38 | 32.5 | 12.2 | 41 |
| 36 | 37 - 40 | 33.5 | 12.5 | 41.5 |
| 38 | 39 - 42 | 34 | 13 | 42.5 |
| 40 | 41 - 44 | 35 | 13.5 | 43.5 |
| 42 | 43 - 46 | 36 | 14 | 44 |
| 44 | 45 - 48 | 36 | 14.2 | 44 |
* Measurements in inches
| Size | A| WAIST (relaxed-stretched) | B| INSEAM | C| KNEE WIDTH | D| Leg Length (outseam) |
|---|---|---|---|---|
| 3/4 | 29 - 31 | 29.5 | 19.5 | 36.5 |
| 5/6 | 31 - 33 | 29.5 | 20 | 37 |
| 7/8 | 33 - 35 | 30 | 21 | 38 |
| 9/10 | 35 - 37 | 30.5 | 22.5 | 38.5 |
| 11/12 | 37 - 39 | 31 | 23.5 | 39.5 |
* Low Rise Pants
| Size | A| WAIST (relaxed-stretched) | B| INSEAM | C| KNEE WIDTH | D| Leg Length (outseam) |
|---|---|---|---|---|
| 3/4 | 29 - 31 | 31 | 18 | 41 |
| 5/6 | 31 - 33 | 31.5 | 18.5 | 41.5 |
| 7/8 | 33 - 35 | 32.5 | 19 | 42 |
| 9/10 | 35 - 37 | 32.5 | 19.5 | 42 |
| 11/12 | 37 - 39 | 32.5 | 20 | 42 |
* Measurements in inches

| Size | A| WAIST (relaxed-stretched) | B| INSEAM |
|---|---|---|
| 28 | 27 - 29 | 14.75 |
| 30 | 29 - 31 | 14.75 |
| 32 | 31 - 33 | 14.75 |
| 34 | 33 - 35 | 14.75 |
| 36 | 35 - 37 | 14.75 |
| 38 | 37 - 39 | 14.75 |
| Size | A| WAIST (relaxed-stretched) | B| INSEAM |
|---|---|---|
| 26 | 25 - 27 | 14 |
| 28 | 27 - 29 | 14 |
| 30 | 29 - 31 | 14 |
| 32 | 31 - 33 | 14 |
| 34 | 33 - 35 | 14 |
| 36 | 35 - 37 | 14 | 38 | 37 - 39 | 14 |
| Size | A| WAIST (relaxed-stretched) | B| INSEAM |
|---|---|---|
| 28 | 27 - 29 | 14.25 |
| 30 | 29 - 31 | 14.25 |
| 32 | 31 - 33 | 14.25 |
| 34 | 33 - 35 | 14.25 |
| 36 | 35 - 37 | 14.25 |
| 38 | 37 - 39 | 14.25 |
| Size | A| WAIST (relaxed-stretched) | B| INSEAM |
|---|---|---|
| 28 | 27 - 29 | 13.75 |
| 30 | 29 - 31 | 13.75 |
| 32 | 31 - 33 | 13.75 |
| 34 | 33 - 35 | 13.75 |
| 36 | 35 - 37 | 13.75 |
| 38 | 37 - 39 | 13.75 |
* Measurements in inches
| Size | A| WAIST (relaxed-stretched) | B| INSEAM |
|---|---|---|
| S - 3/4 | 29 - 31 | 10 |
| M - 5/6 | 31 - 33 | 10.5 |
| L - 7/8 | 33 - 35 | 10.6 |
| XL - 9/10 | 35 - 37 | 11 |
| Size | A| WAIST (relaxed-stretched) | B| INSEAM |
|---|---|---|
| S - 3/4 | 29 - 31 | 11 |
| M - 5/6 | 31 - 33 | 12 |
| L - 7/8 | 33 - 35 | 13 |
| XL - 9/10 | 35 - 37 | 13 |
* Measurements in inches

| Size | A| CHEST | B| BOTTOM | C| FRONT LENGTH | D| SLEEVE LENGTH |
|---|---|---|---|---|
| Small | 23.6 | 21.25 | 26.4 | 24.5 |
| Medium | 24.4 | 22 | 27.5 | 25.25 |
| Large | 25.2 | 22.75 | 28.75 | 26 |
| X-Large | 26 | 23.6 | 29 | 26.75 |
| XX-Large | 26.7 | 24.4 | 30.25 | 27.5 |
* Measurements in inches
| Size | 6” ABOVE MID PATELLA | MID - PATELLA | 6” BELOW MID PATELLA |
|---|---|---|---|
| Small | 14.5 - 17 | 11.5 - 13 | 11.5 - 13 |
| Medium | 17 - 19.5 | 13 - 15 | 13 - 14.5 |
| Large | 19.5 - 22.5 | 15 - 17 | 14.5 - 16.5 |
| X-Large | 22.5 - 25.5 | 17 - 19 | 16.5 - 18.5 |
| XX-Large | 25.5 - 30 | 19 - 22 | 18.5 - 22 |
* Measurements in inches

| Size | LOWER THIGH | TOP CALF | USER WEIGHT (LBS) |
|---|---|---|---|
| XSMALL | 15 - 17 | 13 - 14.5 | 70 - 90 |
| SMALL | 16 - 18 | 14 - 16 | 90 - 140 |
| MEDIUM | 16.5 - 18.5 | 14.5 - 17 | 140 - 180 |
| LARGE | 18 - 21 | 15 - 18 | 180 - 220 |
* Measurements in inches

| Size | LLOWER THIGH(3” above knee) | MID CALF(6” below knee) | USER WEIGHT (LBS) |
|---|---|---|---|
| XSMALL | 15 - 17 | 13 - 14 | 70 - 90 |
| SMALL | 16 - 18 | 13 - 15 | 90 - 140 |
| MEDIUM | 16.5 - 18.5 | 14 - 15.5 | 140 - 180 |
| LARGE | 18 - 21 | 14.5 - 17.5 | 180 - 220 |
* Measurements in inches

| Size | LLOWER THIGH(3” above knee) | MID CALF(6” below knee) | USER WEIGHT (LBS) |
|---|---|---|---|
| XSMALL | 5 - 6.5 | 9.5 - 11.5 | 70 - 90 |
| SMALL | 5.5 - 7 | 10 - 12 | 90 - 140 |
| MEDIUM | 6.5 - 8 | 10.5 - 12.5 | 140 - 180 |
| LARGE | 7 - 8.5 | 10.5 - 13 | 180 - 220 |
* Measurements in inches

| Size | LLOWER THIGH(3” above knee) | MID CALF(6” below knee) | USER WEIGHT (LBS) |
|---|---|---|---|
| XSMALL | 5.5 - 6.5 | 9.5 - 11 | 70 - 90 |
| SMALL | 6 - 7 | 10 -11.5 | 90 - 140 |
| MEDIUM | 6.5 - 8 | 10.5 - 12 | 140 - 180 |
| LARGE | 7.5 - 9 | 11 - 13 | 180 - 220 |
* Measurements in inches

| Size | YOUTH | SMALL/MEDIUM | LARGE/XLARGE |
|---|---|---|---|
| WAIST CIRCUMFERENCE | 20 - 28 | 28 - 34 | 34 - 40 |
* Measurements in inches

| Size | WAIST CIRCUMFERENCE |
|---|---|
| YOUTH M | 24 - 26 |
| YOUTH L | 26 - 28 |
| XSMALL | 28 - 30 |
| SMALL | 30 - 32 | MEDIUM | 32 - 34 |
| LARGE | 34 - 36 |
| XLARGE | 36 -38 |
* Measurements in inches

| Size | YOUTH M | YOUTH L | XSMALL | SMALL | MEDIUM | LARGE | XLARGE |
|---|---|---|---|---|---|---|---|
| A.| INSEAM | |||||||
| LPS 7605 | 7.75 | 8 | 8.25 | 8.5 | 9 | 9.25 | 10 |
| LPS 5605 | 7.5 | 8 | 8.5 | 9 | 9.25 | 9.5 | 10 |
| LPS 4600HW | 7.5 | 8 | 8.25 | 8.5 | 9 | 9.5 | 10 |
| LPS 3600 | 6.5 | 7 | 7.5 | 8 | 8.25 | 8.5 | 9 |
| LPS 1600 | 7 | 7.5 | 8 | 8.25 | 8.75 | 9 | 9.5 |
| LPS 1600G | - | - | - | 8 | 9 | 10 | - |
* Measurements in inches

| Size | WAIST CIRCUMFERENCE |
|---|---|
| YOUTH M | 26 - 27 |
| YOUTH L | 28 - 29 |
| YOUTH XL | 30 - 32 |
| SMALL | 34 - 35 | MEDIUM | 36 - 38 |
| LARGE | 40 -42 |
| XLARGE | 44 - 46 |
* Measurements in inches

| Size | WAIST CIRCUMFERENCE | RIDER’S HEIGHT |
|---|---|---|
| YOUTH | 28 - 32 | 4’ - 5.2 |
| MEDIUM | 34 - 38 | 5’ - 5.8’ |
| LARGE | 40 - 45 | 5.6’ - 6.2’ |
* Measurements in inches
For over 30 years, I have been customizing helmets "For The World's Fastest Racers".
Troy Lee Designs has since expanded into a full force operation, offering a complete line of helmets, apparel and premium protection for off-road motorcycling and bicycling, sportswear and accessories, and operating the TLD / GoPro / KTM supercross and motocross team.
Peace and wheelies,
Troy Lee
At Troy Lee Designs, we firmly believe in the power of design and technology.
Every day, "The World's Fastest Racers" get out there and put it all on the line. We strive to provide them with products that withstand the rigors of professional racing. Products with intelligent features that allow them to perform at their best.
Troy Lee Designs takes great pride in the products we design and develop, replacing conventional ideas with out-of-the-box thinking. By addressing the demands of professional racers, we can deliver innovation to everyone.
Creating products that innovate and lead the market requires a different way of thinking.
Our approach to solving problems is unique. We challenge conventions by turning problems upside-down to achieve advancements that are more intelligent. Our solutions, while sometimes complicated from an engineering standpoint, are designed to be simple, thoughtful and relevant. And of course, to stand out in a crowd.
The end result is a line of products that help you stay focused on your activity, and look great doing it. We have thought about your equipment, so you don't have to.
The conception of new and improved products happens through extensive research and development.
New product development is a proactive process by which dedicated resources are allocated to identify market changes and seize upon new product opportunities before they occur.
Basic science must exist to support a product's viability. And if the science is lacking, it must be discovered or invented.
Safety is at the forefront of developing protective equipment.
Troy Lee Designs has exclusively developed several new safety features into some of our helmets, starting with the D3.
Dual Density Shock Pad System
With the debut of the revolutionary D3 Action Sports Helmet, Troy Lee Designs has introduced an important advancement in impact management the exclusive Troy Lee Designs Dual Density Shock Pad System.
Technology is a vital aspect of the product development process.
Technology refers to the usage and knowledge of tools, techniques or systems, and affects human ability to control and adapt to natural environments. At Troy Lee Designs, we utilize the latest, most comprehensive and proven technologies at our disposal. Our designers rely on technology as their most valuable tool in turning their visions into reality.
By nurturing this relationship between designers and vendors, we create an environment without limits, where one pushes the other to a higher level of success. The result is a line of products that consistently improves over time.


")

")

")


")


")


")

")


")


")